Saturday, February 26, 2011

Valentine for Rachael

I'd seen this technique for using colored glitter over at Stamp TV with Gina K, and I really loved the look, so I knew I wanted to try it.  When I saw this stamp from Kaiser Craft, I thought it would be the perfect candidate for a card for my daughter Rachael.  So, I began the hunt for a Quickie Glue Pinpoint Roller by Sakura, and finally found one at Scrapbooker's Paradise tucked away in the adhesives section (I'd been looking with the pens, for reasons I am not sure).


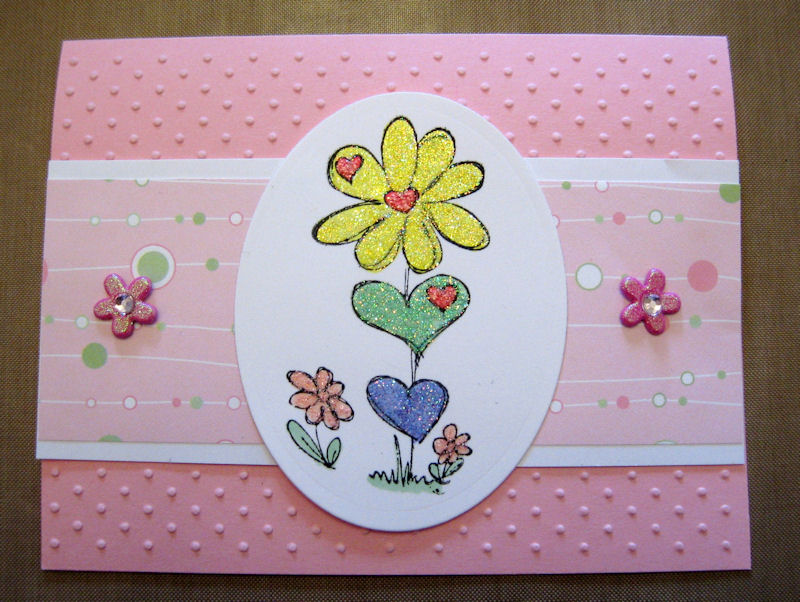
I began by stamping the focal image in Memento Tuxedo Black ink, then coloring it in with Copic markers that best matched the tones of colored glitter I wanted to use.  Then I simply "colored" the individual portions where I wanted the glitter with the Glue Pen, then sprinkled the colored glitter over it, working one color of glitter at a time.  So, I covered the top flower with Quickie Glue Pen, then covered it with yellow glitter.  Then repeated with the green heart, then the lavender heart.  I used Worn Lipstick Stickles to dress up the pink hearts, and put a little Cotton Candy Stickles on the two flowers at the bottom.  It was difficult to capture the shine on this card, but it is gorgeous.   To finish out the card, I cut and embossed with nesties, and popped the image up over some patterned paper matted on white cardstock.  I attached two shimmery brads to the panel, then adhered the whole thing to the pink cardstock base I had created and embossed with the Swiss Dots embossing folders.


Supply List:
Cardstock:  Paper Recollections: pink card base, white cardstock
Paper:  MOD Designs #791395370235
Ink:  Memento Ink in Tuxedo Black
Stamps:  Kaiser Craft: Love Bloom
Embellishments:  Doodlebug Design: Boutique Brads, Sweet Treat Assortment, Stampendous Fringe Benefit Kit: Yellow Pastel Glitter, Mint Pastel Glitter, Lavender Pastel Glitter, Ranger Stickles in Worn Lipstick and Cotton Candy
Basic Supplies:  Fiskars Guillotine Mini Trimmer, Tonic Scissors, Dimensional Foam Squares, Glue Glider Pro, Cuttlebug, Swiss Dots Embossing Folder, Nestabilities Classic Ovals Small, Sakura Quickie Glue Pen

Submitted to:
CRAFT Challenge: Color Aschelon
Really Reasonable Ribbon: Spring 
Bunny Zoe's Crafts: Flowers
Stampin' B's:  Use a Flower
Digi Doodle Shop: Spots and Dots

Sunday, February 20, 2011

Sweets for my Sweets!

Well, this post has gotten off a bit late, but I wanted to show the candy bar wrappers that I had made for my hubby and daughter.  I was really tickled with the way the candy bar wrappers turned out, and the candy I used for this project was the President's Choice Swiss Milk Chocolate with Almonds bar, as they are favorites in this house!


I stamped the Sweet Love image onto white card stock then cut it with Nestabilities and embossed it using my Cuttlebug.  I then filled in the Love with Worn Lipstick stickles, wrapped the bar itself with designer cardstock/paper, and tied a quick and easy bow around the whole thing.  I popped the image up on foam squares.  I laid these candy bards on our dinner plates for our Valentine's Day meal and it made a fun addition to our table and were a huge hit with the family!

Supply List:
Cardstock:  White cardstock from my stash (unknown)
Paper:  TPC Studio: Moroccan Market Random tile, MOD Designs:#791395370235
Ink:   Studio G Ink in Magenta
Stamps:  Imaginisce Sweet Cheri Collection: Chandalier
Embellishments:  American Crafts: Ruban Premium White, Ranger Stickles: Worn Lipstick
Basic Supplies:   Dimensional Foam Squares and Circle, Glue Glider Pro, Cuttlebug, Spellbinders Nestabilities Standard Circles Large

Submitted to:

Little Claire's Designs: Anything Goes 
Dutch Dare: Sparkle Glitter Bling 
PaperPlay Challenges: Add Shine 
Digi Doodle Shop: Anything Goes 
Fussy and Fancy: Sweet Treats
Totally Stampalicious: Glitter & Glitz
Stamp Insanity: Anything but a Card
A Spoon Full of Sugar:  Anything but a Card 
Craft Challenge:  #90, Not a Card

Tuesday, February 8, 2011

Congratulations for Emily!

One of the biggest changes for me since I have relocated to beautiful Alberta from my lifetime home of south central Pennsylvania was that I no longer get to spend every day in the company of my extended family.  My daughter and I lived in extremely close proximity to my mom, my brother, his wife and their 4 great girls...  I miss them more then I thought was possible, and while things like holidays make it more noticeable, its truly the every day moments that I miss most, like Holly jumping into bed with me in the morning while waiting for it to be time to go to the school bus, and baking with my second oldest niece Emily.  Emily is a junior in high school, and she was recently accepted into the U.S. Congressional Page program.  She was lucky enough to be present for the State of the Union address and while she didn't get to shake his hand or speak to him personally, was standing about 2 feet from the President.  Since she's away from home for the first time for an extended period of time, I figured she could use some mail from a friendly face, and I wanted her to know just how proud I am of all that she has done and the fine young woman she has become.


Though I am not the biggest fan of the whole "vintage" look, I knew it would be something Emily would really like.  I started by embossing the pink cardstock panel with clear EP, then inking it with Distress Ink.  I then created the panel using patterned paper, and inked the edges with charcoal fluid chalk ink.  The sentiment was stamped on ivory cardstock and distress inked, then matted with a piece of the same patterned paper's flip side, and then mounted using dimensional foam squares on top of the ribbon.  I also stamped one of the same flowers from the embossed panel, cut it out, inked t with distress ink, then popped it up using a foam circle and adhered ivory Flower Soft to the center.  A few pearls were added to the upper left corner.  I'm not at all happy with the photography of these cards, but I don't have a lightbox yet or a proper place to take my photos, that is one of my next goals.  The close up shows the true colors of the card much better then the overall shot.

Supply List:
Cardstock:  Paper Recollections: Cream card base, DCWV: Summer Dream Adhesive Cardstock Mat: ivory cardstock for flower and sentiment
Paper:  TPC Studio: Moroccan Market Random tile
Ink:   Tim Holtz Distress Ink in Tea Dye, Colorbox Fluid Chalk in Charcoal, Studio G Ink in Magenta, VersaMark
Stamps:  Hero Arts:Everyday Sayings, Clear Stamps by Rhonna Farrer: Double Daisy
Embellishments:  Offray Ribbon: Side Saddle Brown White, Basic Grey: Opaline Designer Half Pearls, Flower Soft: Ivory
Basic Supplies:  Fiskars Guillotine Mini Trimmer, Tonic Scissors, Tim Holtz Foam Ink Applicator, Stampendous Embossing Powder in Clear, Scotch Adhesive Dot Roller, Dimensional Foam Squares and Circle, Glue Glider Pro

Submitted to:
Papertake Weekly Challenge: Anything Goes Flowers
Abby's Scrappy Mom's Challenge:  Anything Goes  
PaperPlay Challenge: Stamp it out 
Craft Us Crazy: Anything Goes  
Simon Says Stamp: Emboss 
Woodware USA: Ribbons and Bows 
Sew Many Cards: Anything Goes 
Fab 'n' Funky Challenges: Tempting Texture 
Flower Soft: In the Garden 
Stamping Vacation: To Who? 
Little Claire's Designs: Anything Goes 
Craft Your Passion: Challenge #44

Friday, February 4, 2011

A New Blog, and a New Card!

I've just recently decided to start a blog focused on my crafting time, primarily making cards and other assorted crafty projects... so I thought I would start with this card I made recently to send to a family member who has been having a hard time lately and I wanted to send them some happy mail.


I'm relatively new to the card-making scheme but I was pleased with how this one turned out.  I really liked the way that the fluid chalk ink gave a "softened" stamp while offering full coverage in the interior of the card.   I inked the edges of this beautiful multishaded and slightly shimmery brown paper from Basic Grey with Tea Dye Distress Ink, then mounted the Jack and Jill Paper from Prima.  Its hard to see in the photos but I used a Quickie Glue Pen to glitter occasional flowers with yellow glitter, then used Cotton Candy Stickles on others.  I also added a little shimmer to the bird eggs, the bluebird, and the flower the little girl is holding with a Spica Glitter pen.

Supply List:
Cardstock:  Paper Recollections: Cream card base
Paper:  Prima Marketing:  Jack and Jill Paper stack, Basic Grey: Cappella Mezzo
Ink:   Tim Holtz Distress Ink in Tea Dye, Colorbox Fluid Chalk in Chestnut Roan, Memento Tuxedo Black
Stamps:  Hero Arts:Everyday Sayings, Studio G: Series 57, Imaginisce: Princess Petals
Embellishments:  Offray Ribbon: Side Saddle Brown White, EK Designs: Silver Mini Bloom, Cotton Candy Stickles, Stampendous Yellow Pastel Glitter, Spica Clear Glitter pen 00
Basic Supplies:  Fiskars Guillotine Mini Trimmer, Tonic Scissors, Tim Holtz Foam Ink Applicator, Sakura Quickie Glue Pen


Submitted to:
Papertake Weekly Challenge: Anything Goes Flowers
Fab 'n' Funky Challenge #58: Chocolate and Blue
Abby's Scrappy Mom's Challenge:  Anything Goes 
Stamping Vacation: Sweethearts 
The Sisterhood of Crafters: Anything Goes
Paper Playtime: Anything Goes
Totally Stampalicious: No Reason 
PaperPlay Challenge: Stamp it out 
Craft Us Crazy: Anything Goes 
Sew Many Cards: Anything Goes